Our Unbelievable Journey
A couple getting out of the rat race through flipping homes and investing in real estate.
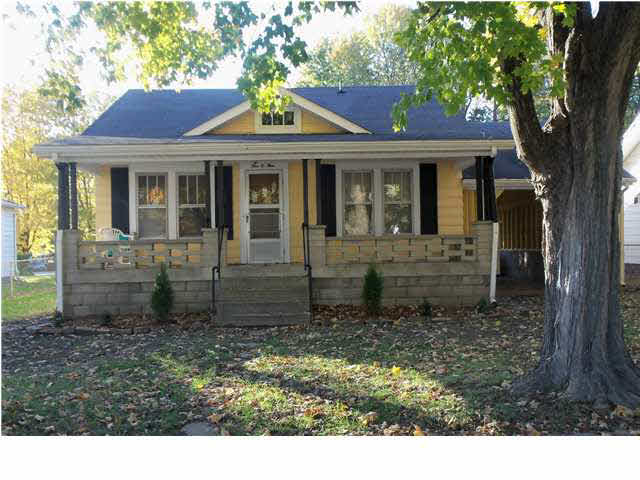
storm damage? We’ll take it!

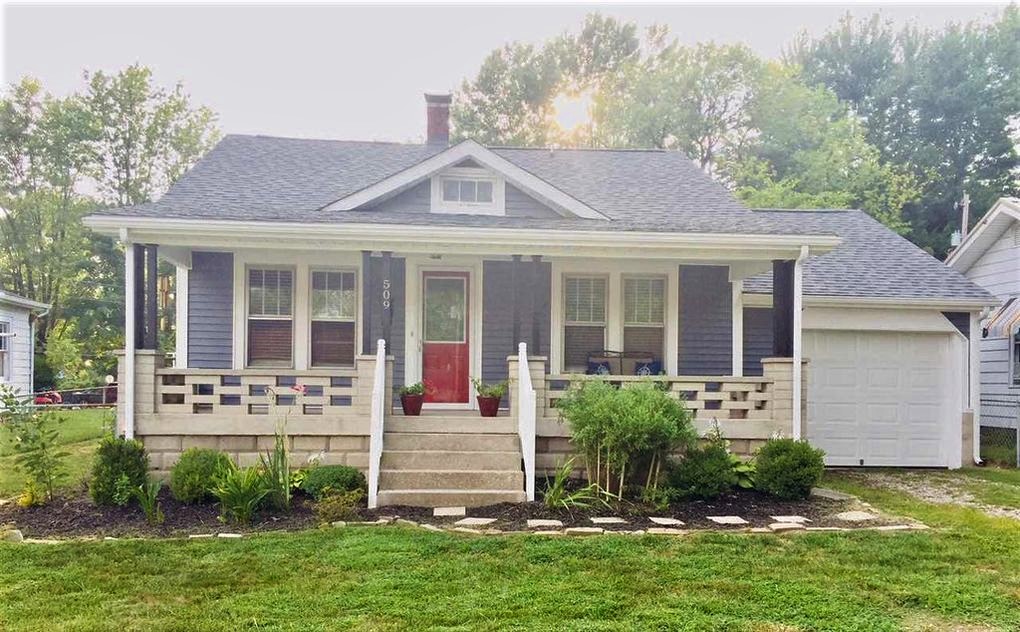
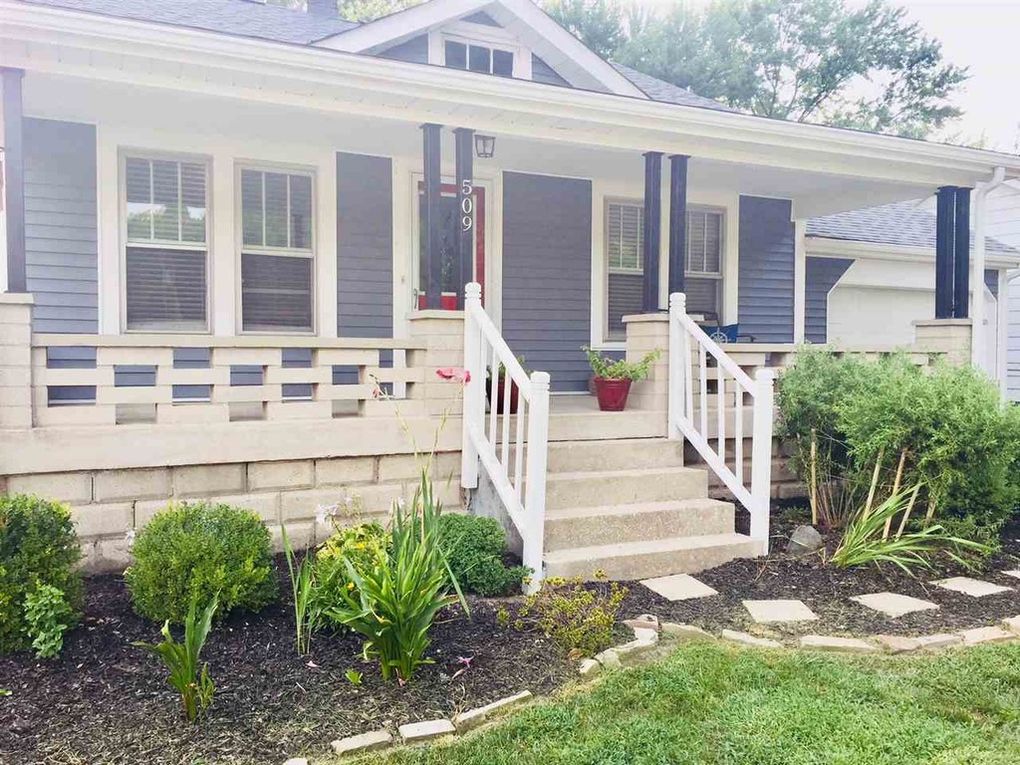
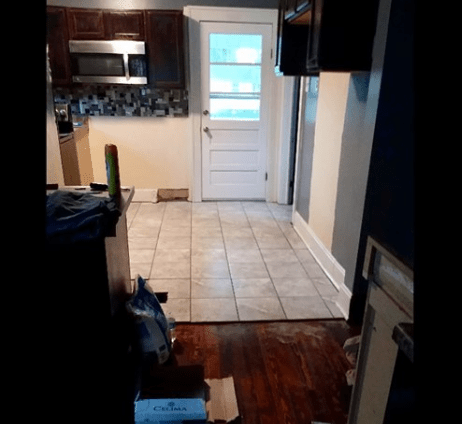
During the middle of our renovation on Sunset, we fell victim to some major storm damage. Hail damage to be exact. We called the insurance company who sent a claims adjuster out the next day. He looked at the roof and the siding damage. He concluded that there was in fact hail damage and that we would need to get a few quotes on repairing the damages. Danny and I immediately thought, if we need repairs to the siding and roof, why not see how much extra it would be to convert the carport into a garage?!
State Farm was only going to cover damage on two sides of the house and the new shingles. We asked to include in the estimate the other two sides of the 6 inch aluminum siding and to convert the carport to a garage. If we are looking at receiving a claim payment to replace part of the siding, it made sense to replace all sides and look into doing repairs we were wanting to do anyways.
After getting quotes for the siding and shingle replacement, the insurance company then depreciates the shingles and the siding based on certain facts like how old the items are. Once we knew what the insurance payout was going to be we could make an educated decision on whether it made sense to invest the extra money to have the siding and garage added. The estimate of repairs was around $18,000-$24,000, and $6,700 would be our cost to add the additional repairs. We decided to do some of the garage conversion work ourselves to keep the cost down to the original $6700. Danny installed a new garage door, an entrance door to the back yard and drywall inside of the garage.
Here are a couple of main points we considered when making the decision to “piggyback” on an insurance claim:
How much are we going to pay out of pocket for the additional repairs? If your payout doesn’t even come close to covering the cost of a complete replacement, you may want to consider just going with a new paint job just to freshen the house up a bit.
You will want to understand how much you will need to pay out to complete the replacement project. Talk with your contractor and get a good understanding of what is being covered on their quote and try to look for anything that may have been miscommunicated or overlooked.
How much can we expect to sell the property for? Simply put, how much do you expect the property will be worth when you are ready to sell. Realtors are a good resource to use here. Especially if you are expecting to sell soon. They will always be looking for a new house to list on the market and are usually more than happy to give you some advice on the market in your area. Return on investment is important. If you put in too much during renovations, you may end up on the losing end, making extra repairs a moot point.
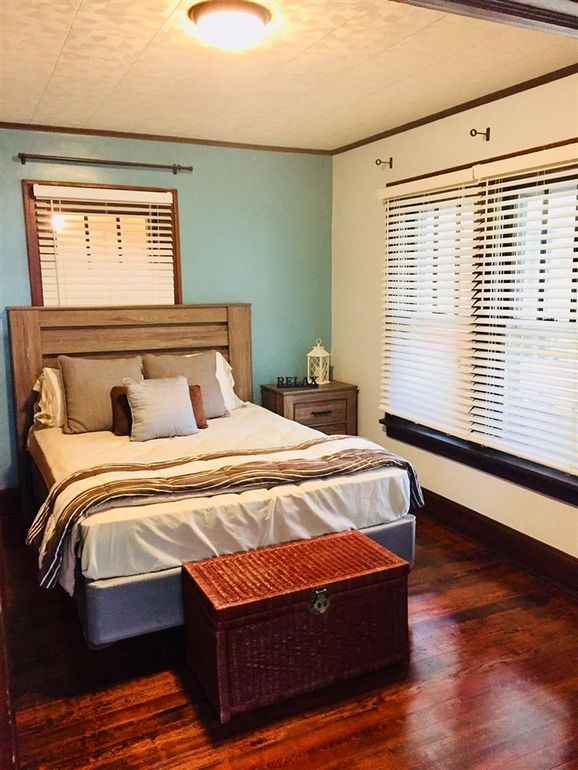
Lets’ talk numbers for a minute here. We purchased Sunset for $42,000. We put in $13,000 in renovations (kitchen, bathroom, floors, paint, blinds, front and back doors, garage door, landscape, etc.) We’re all in this far at $55,000.
The out of pocket cost to us to finish out the remaining two sides and converting the carport to a garage was around $6,700. For us, this additional cost to walk away with all new siding, new shingles, and putting in a finished garage, it was worth it!!
We were at $61,700 all in and ended up selling our house after 4 years for $84,000. That was a $22,000 profit and no capital gain’s tax since we were in the house at least 2 years! Also keep in mind, most renovations were completed by us and we cash flowed the repairs, so when selling, we ended up receiving a check for over $40,000!!
Another way we were able to make a little more money on this deal was that Danny is a licensed Realtor with FC Tucker Emge Realtors and was able to list the house himself. This was one of his first sales and when this house hit the market it was hot. We ended up with multiple buyers bidding for this property and we sold this house in less than a week!!
Thank you to everyone who are currently following our blog and our journey! Make sure to sign up via email to receive notices every time we post:)
refinishing the hardwood floors!

When we bought the house on Sunset, we new there were hardwood floors under the carpet in the living room and dining room, but we didn’t know what kind of shape they were in. We pulled up the carpet (there was no padding installed) and to our horror found that there was cheap ugly tile hiding under the carpet in the dining room. The floors in the living room were actually in good shape. We decided to pull the tile up so we could see what the floors looked like. That’s when we came across the biggest hurdle of all during this process-BLACK TAR PAPER!
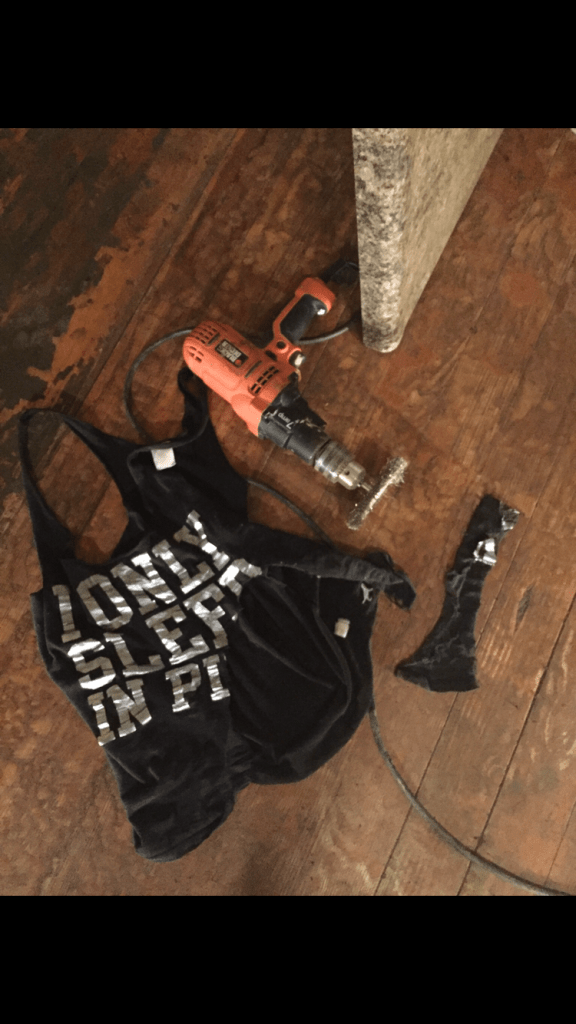
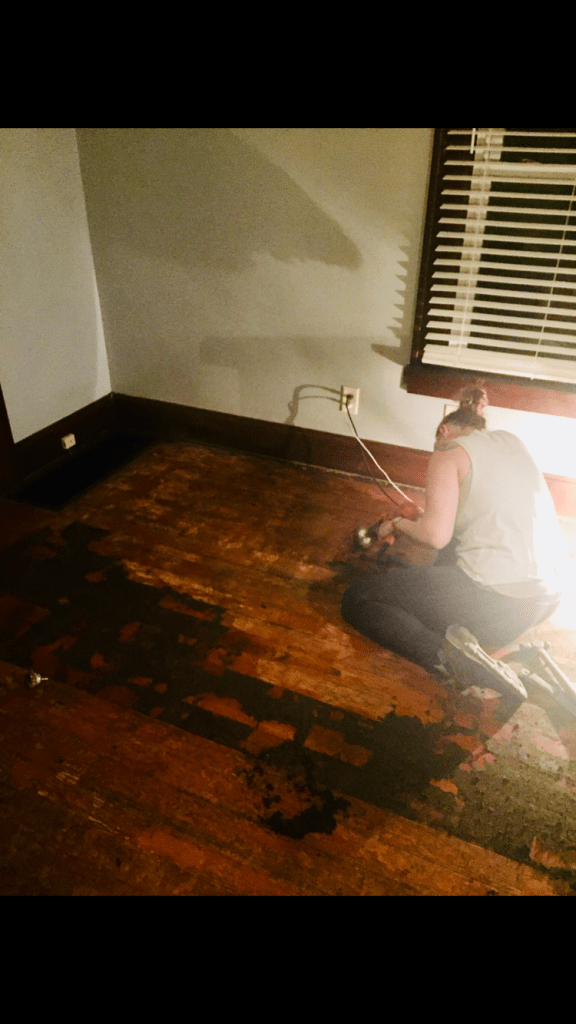
The tiles were installed using a black tar paper as an adhesive! That stuff was not going to come off easy. We tried sandpaper with no luck. The tar paper just got caught up in the sandpaper and we quickly realized sandpaper wasn’t going to work. Since the drill and wire wheel method worked so well in the bathroom project we decided to take that same approach here. We had recently purchased a Black and Decker drill for the bathroom, but had also just purchased a Dewalt Hammer Drill for another project we were working on. We bought a few wire wheels and decided that we would try to see if we could get back to the original floors.
We had moved out of the house on Sunset at this point and had moved into our next live in flip. (Stay tuned for some really great stories on the Southside project house!) This made refinishing the floors a lot easier as the house was completely vacant and the floors had no furniture to work around. We would get home from work, eat dinner, change and head over to spend a few hours working on the floors in the evening. There was at least a week trying to get the tar paper off, but we knew we just had to get this done so we could move on.
So, this could have been a lot worse than it was, but was quite scary! We were using the drills with the trigger lock on and while using the wire wheel, it got caught in my shirt and it was wrapping around my shirt quickly! In a panic mode, I tried to pull it off of me while the wheel was still running up my front. In Danny’s quick thinking, he reached for the power cord and unplugged it! I still have the scar today on my arm as a reminder of being careful when using power tools. It also made me take the precaution of pulling my hair up as well so that it never gets caught in anything!
YIKES! 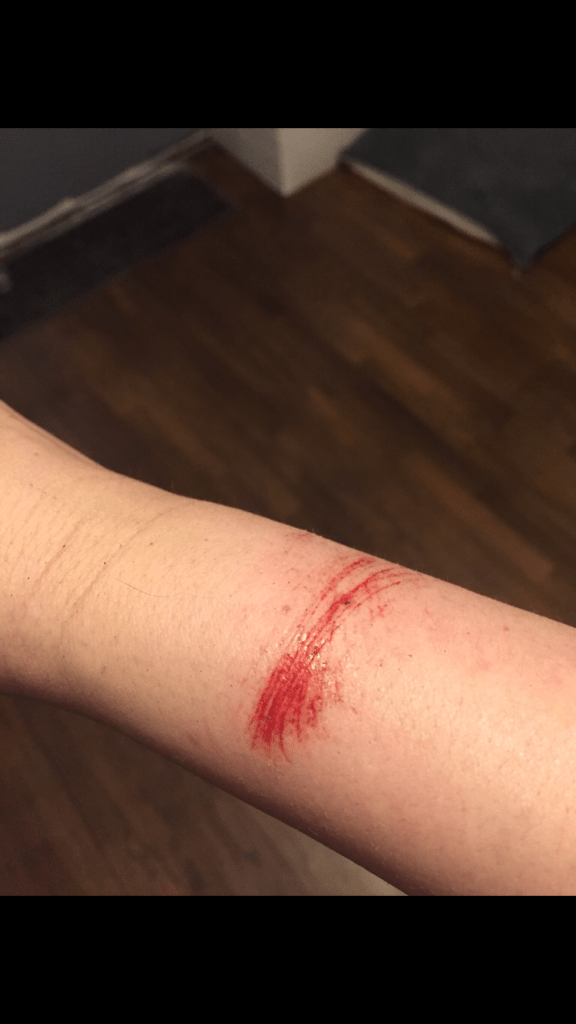
Once we got the tar paper up, we decided to rent a floor sander to get the floors back to bare wood. We started with a highly abrasive 36 grit sandpaper for the first step in sanding. After we had all of the floors sanded and back to a “naked” state, we repeated that process using a 60, 80, and 100 grit.
Once the floors were sanded back we needed to use a hand sander to sand back the edges of the room to avoid getting a “picture frame” around the outside edges. A good orbital sander did the trick but it did take some time and effort (Danny used a Dewalt Sheet Sander). You can get them pretty inexpensively and we picked ours up at Lowes for $50. Once we sanded back the edges to bare wood, we had to tackle the important process of removing the dust! It was everywhere (including all over the walls, windows, blinds, etc!). We swept what we could up, the used the Shop Vac to get the rest. Once we were at this point we pulled all of the windows open and wiped the floors clean with mineral spirits and clean lint free rags. You’ll want to change out your rag very often as the goal here is to remove the dust and not just move it around.
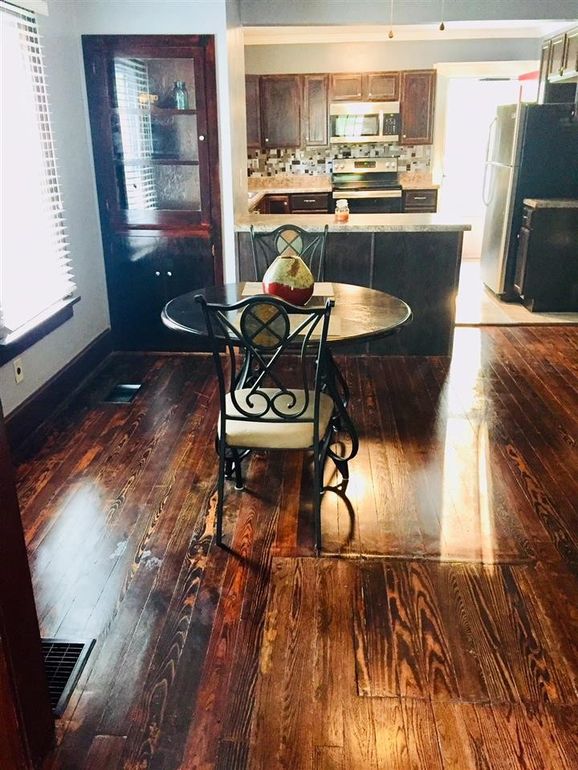
When we had the floors clean and prepped we picked out our stain, Minwax Espresso, and picked up our supplies. Lowes had everything we needed. We used a Minwax 10 inch Lambskin pad on a 10 inch applicator. We just bought steel paint trays to pour the stain into for application and had a lot of lint free rags on hand to wipe the excess stain off of the floor.
The staining process is relatively simple and straightforward. Wipe the stain on using the applicator, and work a section small enough that you can go back in a few minutes to wipe the excess making sure you follow the grain of the wood. Key points: Always wipe with the grain of the wood and don’t “paint yourself into a corner” (and don’t wear good clothes or socks because they will be stain covered). We started at the point farthest from the “exit” and worked our way in the room towards the door. Apply, let sit, wipe up, move on to the next section.
We moved room to room working our way from the second bedroom (the farthest point from the from door) to the dining room. Once the dining room was stained we moved into the master bedroom and then finished with the living room. Once we finished staining the living room we just gathered our supplies on the porch, locked up the house and went home for the night.
The next day we started putting our poly coats on. If you tackle a project like this you will want to put at least five coats of poly on, but we prefer to do seven coats. Seven coats will give you a deep shine and will be a thick layer of protection that will stand up to wear and tear better, especially if you have pets. We used Varathane Water Based High Traffic floor polyurethane that we bought at Menards ($42/gallon) for this process. We stuck with the Lambskin pad on the 10 in applicator. Since we were doing this in the evenings after work, we would head over after dinner and put a coat of poly on the floor each night. Poly goes on almost just like stain except you don’t wipe the excess up. Just work with a wet edge, go with the grain of the wood and apply in thin layers. Several thin layers is better than one thick layer! We did this every day for 7 days. At the end of the fourth day we could really tell a difference, but at the end of the 7th day all we could say was wow! “What a difference!!”
Thank you all for following, and if you haven’t followed our blog yet you can subscribe via email and receive our latest posts directly in your inbox!

BEFORE 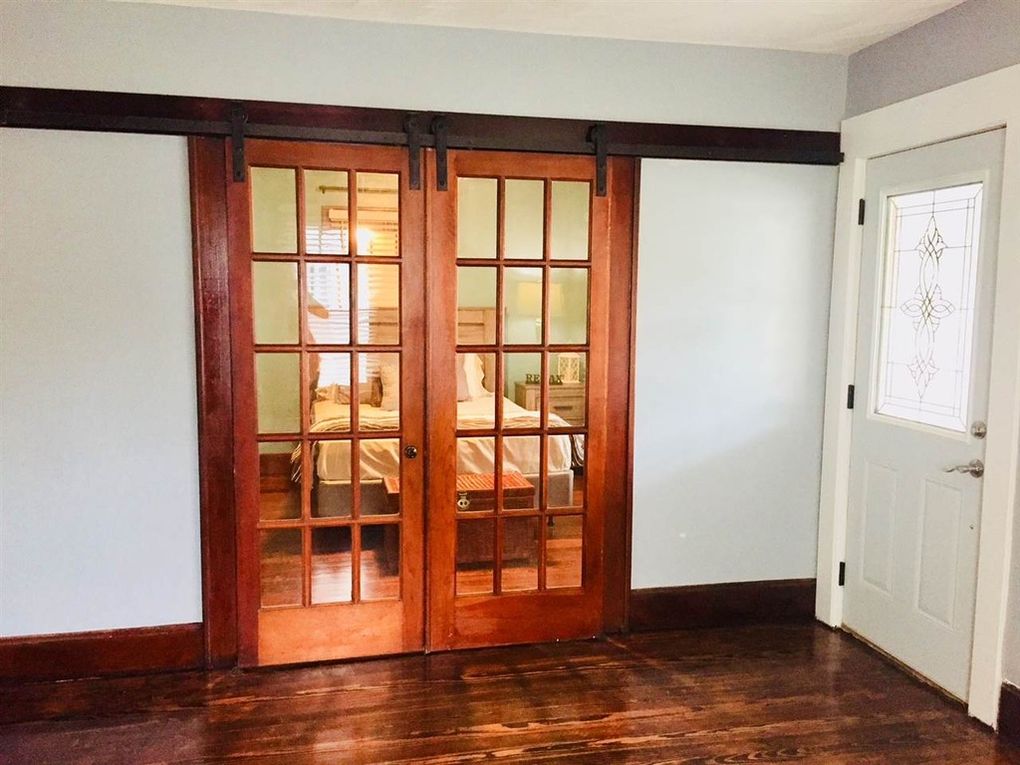
AFTER 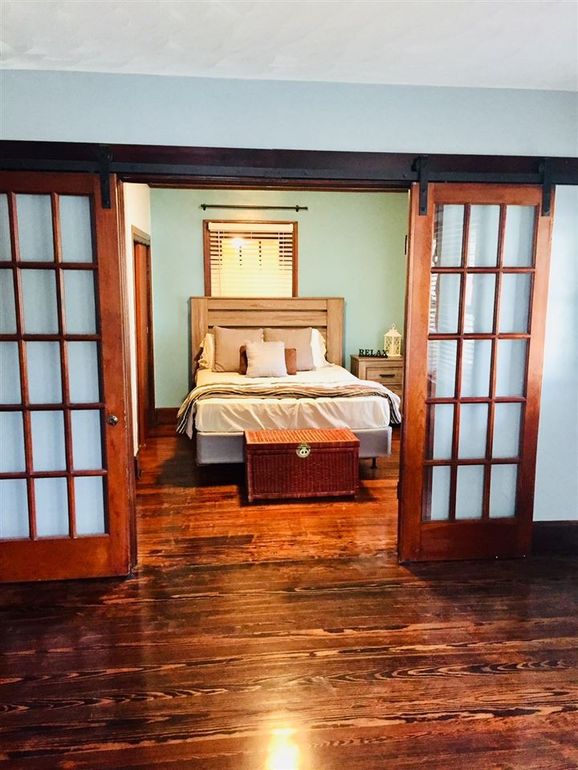
AFTER

BEFORE 
AFTER
REMOVING TAR PAPER 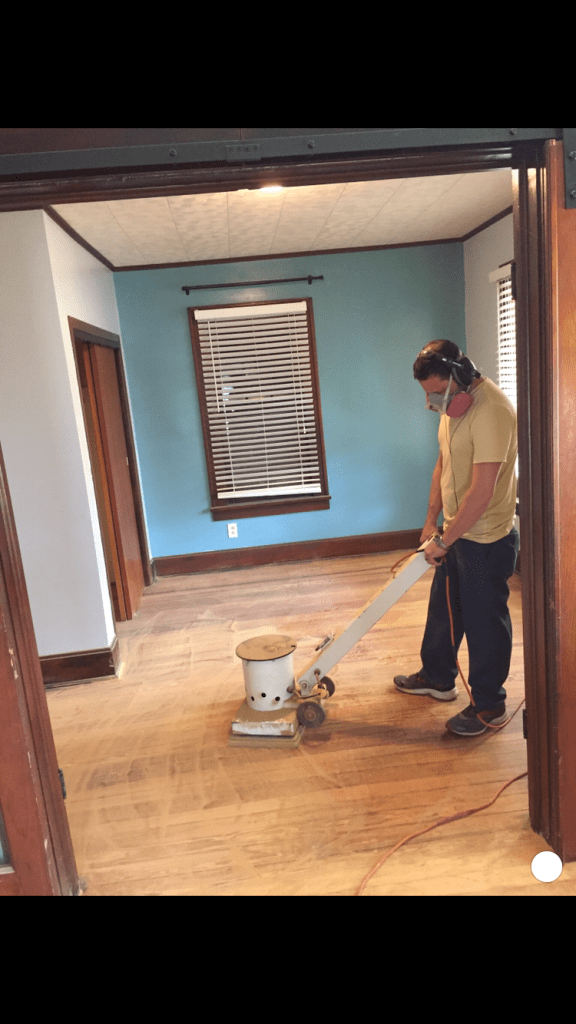
SANDING THE FLOORS 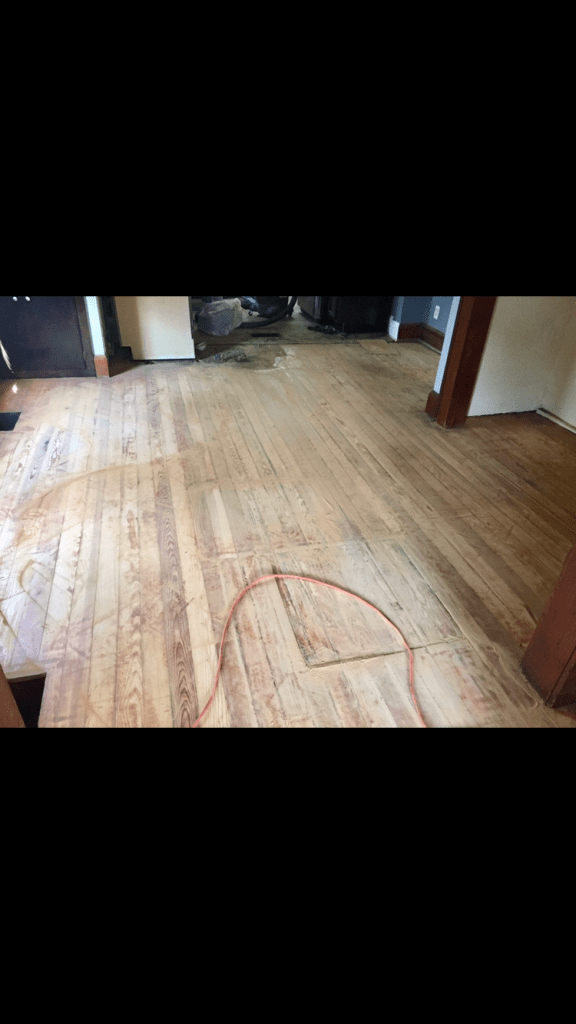

2ND BEDROOM BEFORE 
2ND BEDROOM AFTER
time for the kitchen part II

We decided to set the counters, sink and faucet in order to have a “functioning” kitchen before starting the floors. We went with a Sterling Southhaven single bowl sink and a Project Source Pull down two handle faucet. If you haven’t read “Time for the Kitchen Part I” yet take a few minutes and check that post out first!
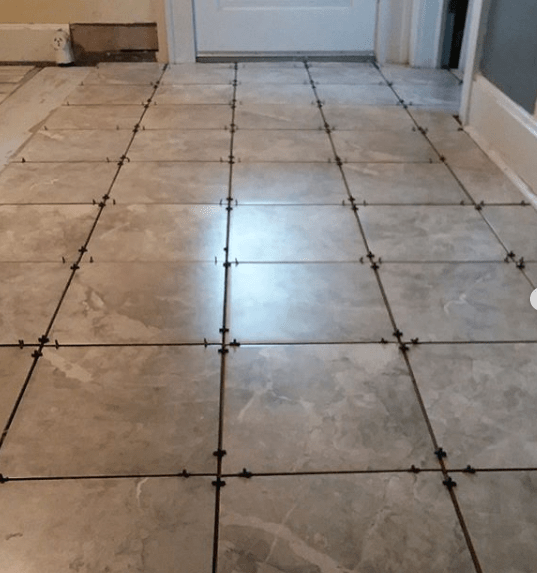
On to the flooring project…we were planning to redo the hardwood floors throughout the house, but once we pulled up the carpet, (yes, there was carpet in the kitchen) we discovered the black tar paper underneath. We had tried for quite some time to remove it with drills and wire wheels, but when we found sub floor under the tiles we had to take a different approach. Plan B was to lay tile flooring. Staying on a tight budget, we picked up an inexpensive tile we found at Lowes.
Danny installed Hardy Backer Board on the floors and got to work laying tile the following day. Laying the tile went pretty quick as there weren’t a lot of cuts to make. The trick on this floor was the lines. We had to have good straight lines as you could see the kitchen floor from the living room. Danny used 3/8 inch tile spacers from MD Building Products to get the tiles to lay straight.
The next day was grout day! We were one step ahead of the game as we had already learned that you definitely do NOT let the grout dry before you wipe it off. So, working in a 3 foot square, the gout went on. We left it to dry for about 10 minutes and wiped it off. Once the next section was grouted we would go back to the previous section and wipe it a second time. The key to wiping grout off is keeping your water clean. You will need to change out your water frequently in order to battle grout haze. We found that the easiest way to do this was with a 5 gallon bucket of water and grout sponges.
The backsplash was a Memorial Day weekend project. Since we hadn’t laid backsplash before, Danny watched a few YouTube videos before getting started to make sure he knew what he was doing. It didn’t take too long as we used mosaic tile and worked on the project together. As Danny put grout in, I went along and wiped the excess off with a wet sponge making sure to change the water out frequently. The tiles went right up and this install was pretty easy with little to no fuss at all!
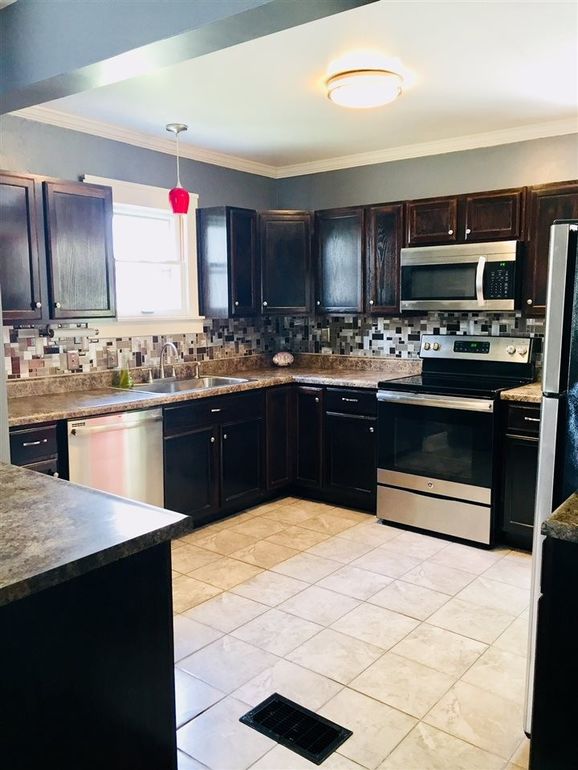
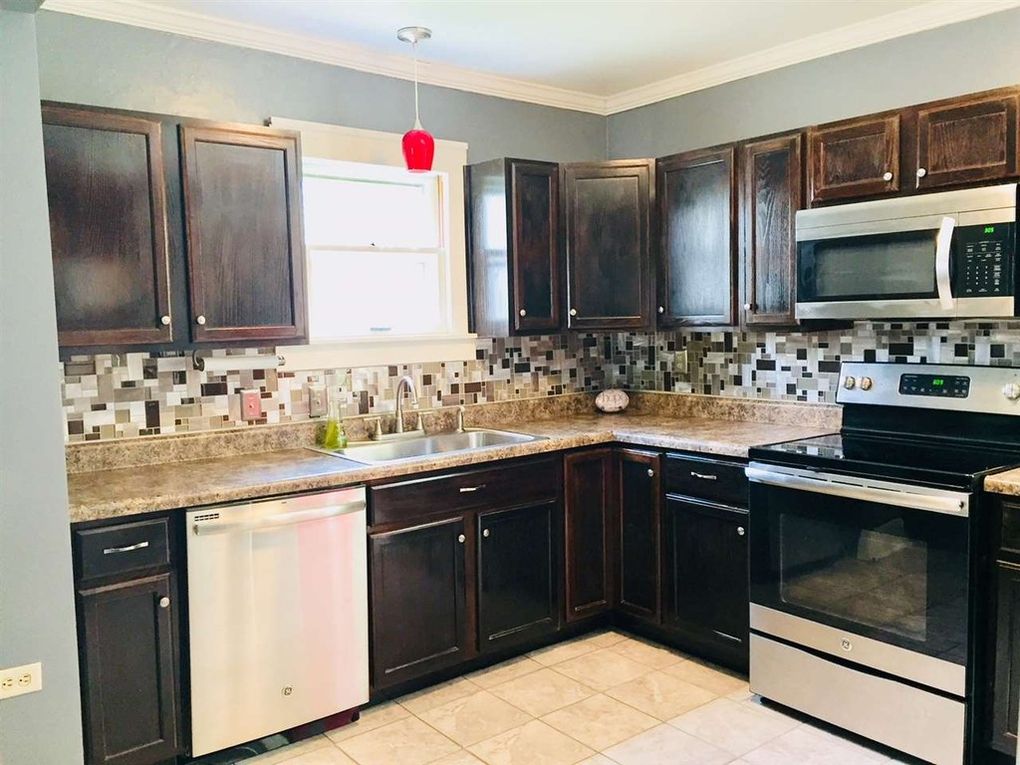
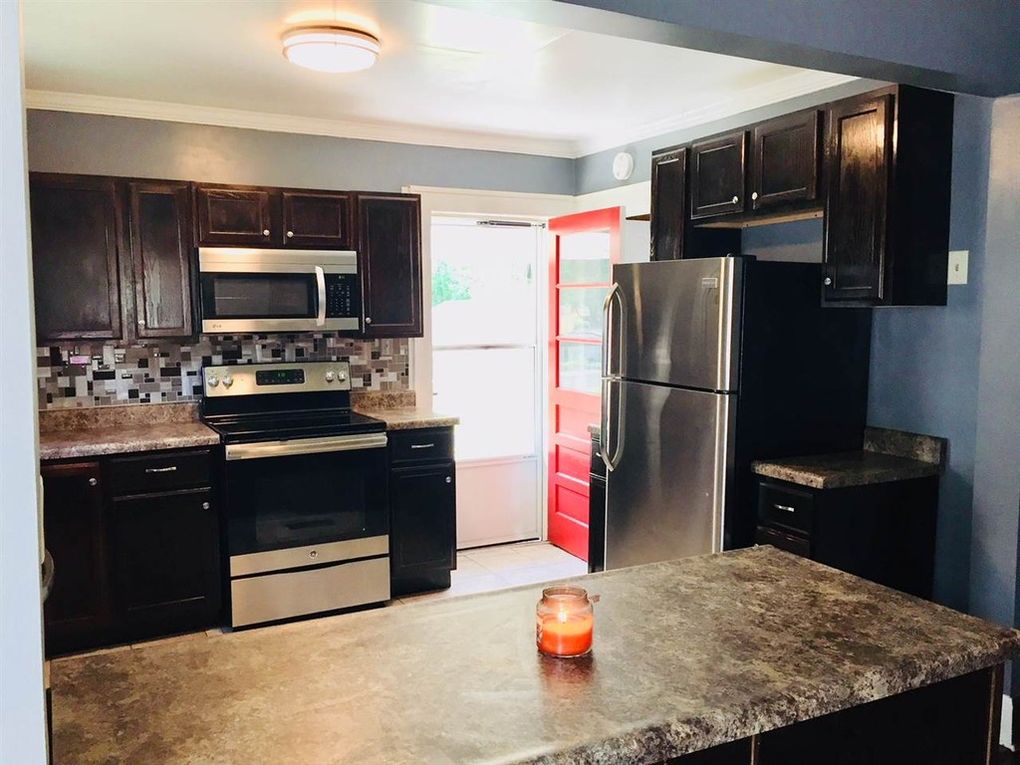
The last few items were pretty small and easy finishing touches. We installed new lighting in the center of the the ceiling and replaced the old light fixture over the sink with a simple pendant light. We decided that the red light shade would bring a nice pop of color. We installed quarter round on the baseboards to give the floors a finished look and decided to paint the outside of the back door red to match the front door and the pendant light.
All in, this project went pretty smoothly and no real horror stories to tell but we gained a little more experience and a lot more confidence! This project seemed pretty daunting when we started out but we knew if we plugged away and kept at it, we would have a nice updated kitchen in the end!
Next up, we learn how difficult it is to refinish hardwood floors!


Please make sure you follow our blog and sign up to receive email alerts every time there is a new article posted! You don’t want to miss out on the latest!
time for the kitchen part I

Before 
After
Once the Bathroom was completed the next project to take on was the kitchen remodel. The kitchen still had the original cabinets that were built to fit the space. Much like you will see in everything else, we did this remodel on a tight budget and did the work ourselves. It was important to give the space a nice facelift without spending a ton of money.
Naturally, the first part of every project means you have to tear out the old in order to put in the new. This is where may have jumped the gun a bit! Danny took out the overhead cabinets and the base cabinets and it was at this point we stopped and realized that we were going to still need at least a sink. So we just cut the countertop to fit back onto the 36 inch sink base and we left that in place. We literally had food and dishes sitting in boxes in the dining room (and everywhere else) for a month! Lesson learned. Don’t tear out the old unless you are ready to replace it with the new!!
The second part of the project was tackling the old “decorative” drop-down, ceiling tiles. Once the ceiling tiles were removed we could see that the drywall behind those tiles would need replaced. Danny picked up the new drywall sheets from Lowes in our old red Ford pickup truck and started the drywall installation on a Saturday morning. Another lesson we had learned at this point- sometimes spending a little money on tool rentals can be very much worth it. We rented a drywall lift. However we didn’t take into consideration that the kitchen only measured 13X11 so maneuvering a 4×10 sheet of drywall and the lift in that space was really a challenge!
We both despise finishing drywall. The work, the mess, the dust! The dust is probably the worst part of the process. However, if you can live through the mess it’s all so worth it on the other side!
While we were working on the drywall and sticking with the tight budget, Danny had picked up unfinished, oak cabinets at Lowes and had started staining and finishing them in the garage. This process took a couple of weeks to complete but they looked great when they were done! The process can be a little mundane but if you do it right the results can come out looking fantastic.
Step one is the sanding. Ugh, more dust… You have to sand every surface to make sure you remove all of the scratch marks and imperfections in the wood. Step two is stain. We decided to use the Minwax Polyshade Stain and Finish in Espresso. These cabinets took two coats of stain and came out with a deep, rich color. Once the stain was dry, Danny sanded all the surfaces lightly with a high grit sandpaper and wiped the surfaces clean. The next step is the clear coat. He put three coats of Minwax Polyurethane on the cabinets making sure to sand and wipe in between each coat. We thought this process would take a few days but actually took about two and a half weeks! That’s hard to swallow when you have already taken your cabinets out!!
Install day for the kitchen cabinets unfortunately was a day that I had to go to work so Danny made a few mounting jigs to help hold the cabinets in place while he installed them. Once the cabinets were in and the plumbing was all re-installed he mounted the counter tops. We decided to place a wide crown molding up since there was an unfinished gap from where the ceiling and walls met. Danny had never installed crown molding before so there were extra trips to Lowes and A LOT of videos on YouTube watched!
Day two he finally got a couple of good cuts and molding started going up. He figured out that the molding had to be cut at the correct angle and you cut it backwards and upside down on the saw. Not confusing at all, especially when you have an older house and the walls never meet at a 90 degree angle. Danny also figured out how to cope the molding to get it to fit together better. We learned that you have to be willing to accept defeat but be willing to come back the next day and try again. Even if that means you have to go back to Lowes to buy more molding because you made too many mistakes.

Please be sure to follow us on our blog and sign up to receive email notifications every time we release a new post!
OUR FIRST PROJECT…OUR BATHROOM REMODEL

When we first moved into Sunset, we had no shower for a year. It only had a bathtub, in the 1950’s a lot of homes still didn’t have showers installed. Danny made a make shift shower using a camping shower head and a shower curtain liner with 2X4’s. He simply tapped in to the existing false wall where the plumbing for the tub was located, framed in the area where the shower water line would run and covered that new frame with a shower curtain to keep the water in the tub area. We used this for another year before really starting this project. Let’s also not forget to mention this is a 2 bed 1 bath house!
This bathroom was 4 ft by 11 ft (Jack and Jill style) and we decided on a walk in shower, all tile. We wanted it to look rustic with different wood types. We had some old barn wood and used lath wood that was behind the drywall when tearing the walls out. Bead board was used on the ceiling with old 1X3 strips, painted white.
Demo consisted of taking out the existing cabinet and sink, medicine cabinet, cast iron tub and the fixtures. Once that was out of the way we tore the wall covering off! Say goodbye to grandma’s faux tile flowered walls! Behind those coverings were plaster and lath walls. The plaster and lath quickly came out and we were back to the studs. Talk about an oh sh*t moment!
We very quickly found out that when doing a project that you have never done before, YouTube is your best friend! Danny watched video after video trying to figure out how to make the shower pan. We needed to research what products needed to be used in order to make the shower water tight. We needed to know how to lay tile. Needless to say there were quite a few days when we spent time undoing something we had just done in order to make it right.
We were planning on going without a shower for a couple of weeks, but this turned into a 3 month project!! There is nothing wrong with the idea of driving out to the family farm that is surrounded by vegetable fields, pulling into where the farm market is and running in to take a shower real quick. Let me tell you, after a couple of weeks it starts to get old, and we did this for 3 months! Never-mind the fact that for a week we had no toilet and I had to go to the neighbor’s house often. On top of that, while Danny was installing tile, he would have to put the toilet back on and then take it back off until the tiling was completely finished.
Danny decided to go with the Schluter Kerdi Shower System to waterproof the area. This product was really easy to use and install. I would very much recommend it especially if you have never waterproofed a shower or bathroom before. There were multiple trips to Lowes to pick up the shower system, concrete, Mapai mortar and grout. The plan was to cut any of the tiles needed by hand. That plan quickly went out the window. Like when we had to cut the first tile. We invested less than $100 (and I do mean that it was an investment) in a Skil 3540 Table Wet Saw. That decision saved us a lot of time and even more headache! We also picked up some of the necessary tools we would need to start this project like trowels, float, sponges, buckets, mixer blade and knee pads.
We installed the Schluter System using the mortar. Once that was dry we started cutting and installing the tile. The tile we picked up on sale at Menards almost 6 months before we started the project. I think one of the biggest tips we picked up on is to lay your tiles out and have a plan for how they will fit. You don’t want to end up with a tile in the corner that is 2 inches wide because you didn’t plan the layout. For the tiles around the shower head, Danny just used a cut off wheel and slowly cut a circular shape to make the hole. He did the same thing for the shower handle and the toilet.
At this point we are several weeks in and the frustration of living in a house with no working bath is starting to take it’s toll. We are wishing we could just take a shower in our own house and we felt like we were still miles away from getting done.
Once the tile was laid, we were on to grout. Danny had never laid tile before and this is when he made a BIG mistake. He didn’t realize that grout dried so quickly. Once he had covered 2 and a half walls completely he decided to wipe off the excess grout only to find that it had completely dried to the tile!! He did some research and tried multiple ways to try to get the dried grout off of the tile. The best option was with a Nylon Abrasive Wheel and the only place that carried them was Menards (which was an hour away)! This was by far the biggest error in the project. I remember Danny coming outside at one point and he was covered in white dust from head to toe! He looked like a ghost! After many days and many wheels, long hours, sore muscles and almost burning up a new drill the grout had been ground away. When the grout was in, we moved to the wood.
This barn wood held a special place in our hearts as it originally came from one of the old out buildings on the family farm. We loved the look that it brought to the space! Once the barn wood was in, we mounted the old lath board horizontally and put a clear coat on it. We decided to use bead-board on the ceiling to give it a little flair and keeping with the rustic look. We then installed the toilet, the cabinet, sink, mirror, lights and fixtures and FINALLY we had a wonderful shower to use in our own house! And what a shower it was!!!

Bathroom Before 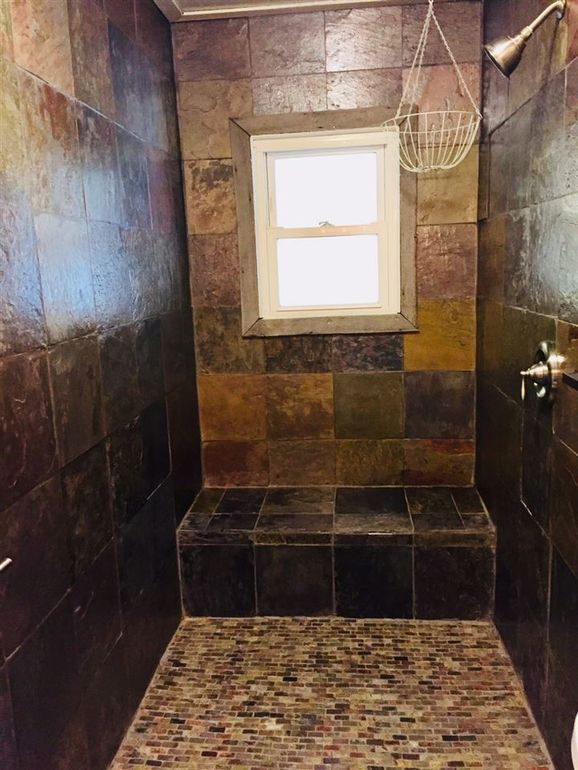
Bathroom After 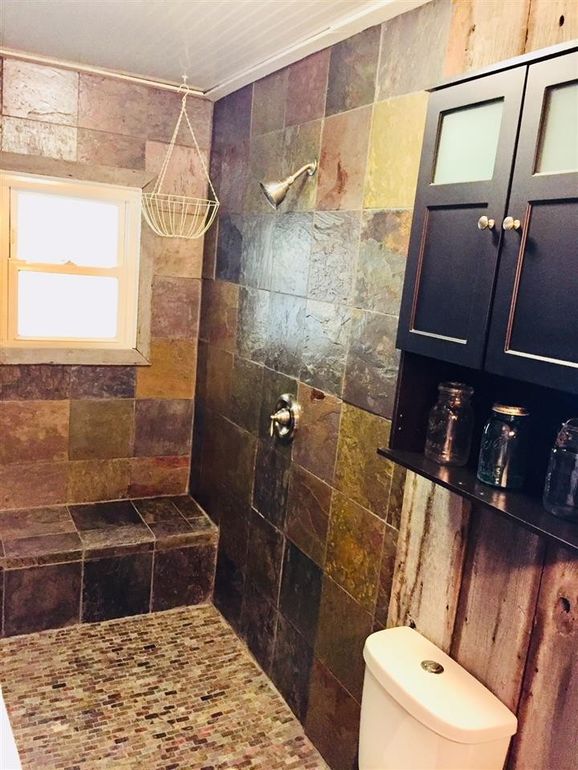
Complete tile shower & floor with tile bench 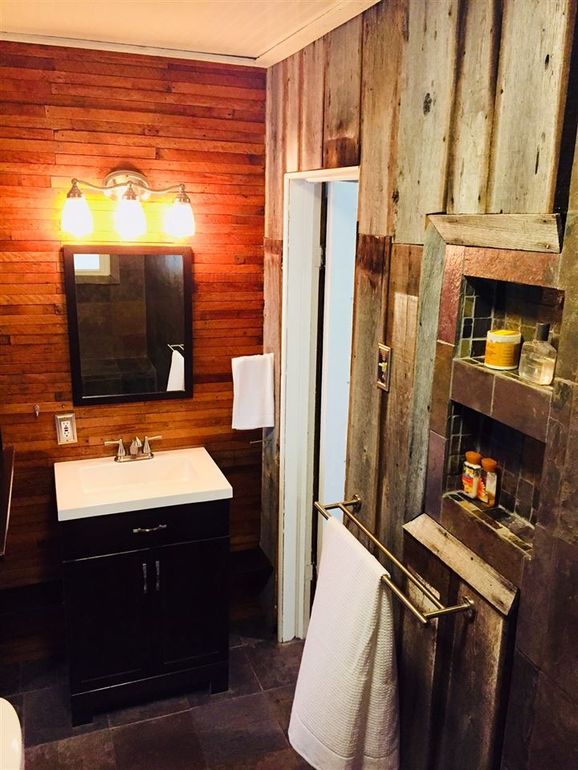
Barn wood & lath board walls with tile built-ins 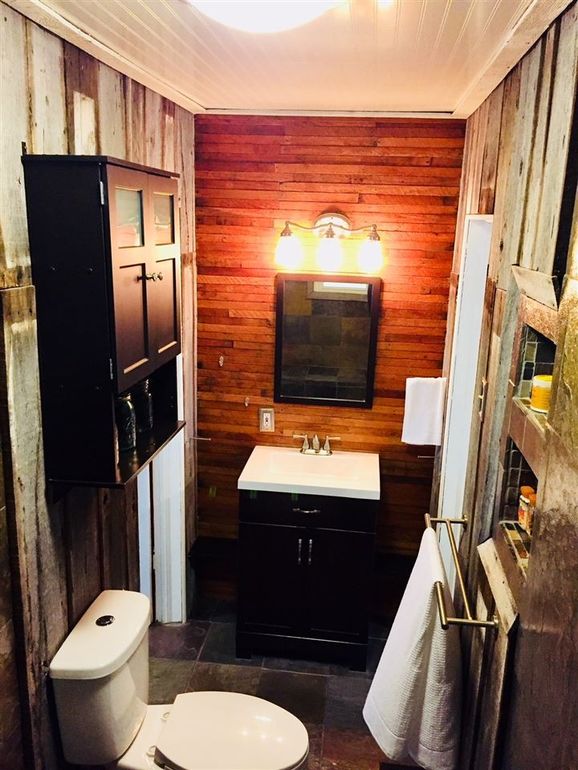
New vanity, toilet, cabinet, light fixtures
Our Journey Begins

We decided six years ago to down size and move closer to family. This allowed us to go to one income while I finished grad school. Homes and cost of living was so low here. We never had a mortgage payment of $350 before! My husband has always been a “do it yourselfer” and with all of our free time living in a tiny town, we had all the time in the world.
With the slower pace of life and the low cost of living in a rural town we decided to make our “downsize” house one that we loved. So, we decided to do a complete renovation over the span of three years. We chose a little yellow 2 bed 1 bath house in town that needed a complete facelift. New bathroom, new kitchen, refinished hardwood floors, new vinyl siding, new roof… the list actually got pretty intensive.
With so much time on our hands, we started to think what it would be like to not have to work a 9 to 5 job anymore. How could we get out? What would it take to escape the rat race? We started listening to a lot of podcasts such as Bigger Pockets and Choose FI. We tuned into a lot of books on Audible like Simple Path to Wealth, The 4-Hour Work Week, and Set for Life. We were learning as much as we could about becoming financially independent through investing in real estate.
This first part of our journey, “the beginning”, will be laid out by project and we will discuss what went wrong, what went right and how we managed to get the project completed. We will tell you right now there was definitely a LOT of YouTube being watched! We did most of the work ourselves and our experiences cannot be duplicated, BUT they can be learned from (and may be down right shocking). Also, we want to be sure to mention, all of this was (and is) taking place while I was finishing grad school. We both work full time, very demanding jobs.
“In the truest sense, freedom cannot be bestowed; it must be achieved.” Franklin D. Roosevelt
Sunset – Our First Flip (Before)

Sunset- Our First Flip (After)
